Monday, 29 June 2020

sssd service failed to start

This issue will be resolve follow only 3 steps 


  1. Stop the sssd service
  2. delete the local cache files: rm /var/lib/sss/db/*
  3. Restart the service

    Tuesday, 26 February 2019

    usb block fedora 29

    To block USB in Linux 


    touch /etc/modprobe.d/disable-usb-storage.conf

    echo "install usb_storage /bin/true" >> /etc/modprobe.d/disable-usb-storage.conf


    to check usb is attach, if attache it remove

    lsmod | grep -i usb_storage


    now (after remove usb)

    modprobe -r usb_storage;


    To reenable usb

    rm /etc/modprobe.d/disable-usb-storage.conf


    Monday, 10 October 2016

    HP Laserjet 1218 printer language change

        1.  Press the Power button to turn on the product.
    · 2.    On the control panel, press the Setup button to open the main menu.
    · 3.  Press the Left Arrow button three times to select System setup, and then press OK . The Language option displays.
    · 4.        Press OK to open the Language menu.

    ·  5.       Press the Right Arrow button to select the language that you want to display, and then press OK .
    Press the Return button twice to go back to the main menu.

    Saturday, 30 January 2016

    Task Manager has been disabled

    That's a very common problem for Windows users. Many times when you try to open Task Manager, you find that "Task Manager" option has been grayed out:
    Task_Manager_Disabled_1.jpg
    Also when you try to run it by typing "taskmgr" in RUN dialog box, Windows shows following error message:
    Task Manager has been disabled by your administrator.
    Task_Manager_Disabled_2.jpg
    There might be 2 possible reasons behind this problem:
    • Your system administrator applied the restriction using Registry Editor or Group Policy Editor.
    • Your system has been infected with virus and it has disabled the Task Manager.
    If you are already the Administrator of the system, then your system is most probably infected. You should follow the instructions given in following topic first:
    Now if your system in not infected or you have successfully removed the virus, then you can follow these simple steps to enable Task Manager again:
    1. Type regedit in RUN dialog box or Start Menu Search box and press Enter. It'll open Registry Editor. If Registry editor is also disabled, then follow instructions given in following tutorial:
    2. Now go to following keys one by one:
    HKEY_CURRENT_USER\Software\Microsoft\Windows\CurrentVersion\Policies\System
    HKEY_LOCAL_MACHINE\Software\Microsoft\Windows\CurrentVersion\Policies\System
    HKEY_USERS\.default\Software\Microsoft\Windows\CurrentVersion\Policies\System
    and look for a DWORD value "DisableTaskMgr" in right-side pane. If you find it, delete it.
    Enable_Task_Manager.jpg
    3. That's it. Now Task Manager will be enabled.
    PS: If you are not familiar with editing the registry, then you can use ready-made registry script to do the task automatically. Download following ZIP file, extract it and then run the extracted .REG file. It'll ask for confirmation, accept it:

    Wednesday, 20 May 2015

    BCC rule in outlook 2010

    How to Automatically BCC in Outlook 2010

    Outlook 2010
    Article summary:
    • A step-by-step screenshot tutorial for automatically BCCing an email address for all outgoing Outlook messages.
    • From Outlook 2007 to Outlook 2010, Microsoft removed the BCC field. We’ll show you how to add the BCC field back in.
    • To auto BCC in Outlook, we’ll need to show the developer tab and add a script.
    • See the comments for how to set up an automatic BCC for messages sent only from a particular email address (for multiple Outlook accounts—thanks Nathan!)
    Perhaps it was due to one too many passive aggressive intra-office stealth BCCs (Blind Carbon Copy), but for some reason, Microsoft decided to seriously roll back access to BCCs in Office 2010. For one, the new message dialog doesn’t even have a BCC field. But you also can’t set up Outlook 2010 rules to automatically BCC someone (although you can set up a rule to automatically CC a message). For my purposes, this is kind of a pain. I am a Gmail/Outlook hybrid user (I have about three different email addresses, each for a different purpose) and I like to keep all of my messages archived in my main Gmail account for easy reference. So, what I wanted was a way to forward all of my sent messages to my Gmail account (I already have all incoming messages forwarded there by a sever-side rule).  Easier said than done but I think I’ve figured out the easiest way.
    It turns out that there are three things that need to be done to unlock the full potential of BCC in Outlook 2010:
    1. Show the BCC Field in the New Email window.
    2. Reveal the Developer ribbon.
    3. Add some custom Visual Basic code.
    It’s not as difficult as it seems. But let’s move through them from easiest to hardest.
    (Note: You can also buy third-party Add-Ins for Outlook 2010 that do this—but I’d recommend this method. It’s free.)
    If you are having an issue where this stops working after you restart your computer, please read the note about macro security at the end of this article.

    Show the BCC Field in New Emails in Outlook 2010

    Step 1

    Launch Outlook 2010.

    Step 2

    Click the New Email button. In the message composition window, click the Optionstab.
    Reveal BCC in Outlook 2010

    Step 3

    Click the BCC button.  This reveals the BCC field. Henceforth, you shall have access to the BCC field in all future Outlook 2010 emails. If you get tired of the extra space it takes up, you can just click it again to be rid of it.
    Reveal BCC in Outlook 2010
    Now, you can use the BCC field for one-offs. But what if you wanted to automatically BCC yourself (or someone else) on every outgoing message? To do this, follow the steps below.

    Display the Developer Ribbon

    I’m basing this how-to on a great bit of custom Visual Basic code written by Michael Kizer. Michael wrote this VBA snippet for Outlook 2007, but it works for Outlook 2010. The only problem: it’s a bit tough to find Visual Basic Editor in Outlook 2010. It’s hiding in the Developer ribbon, which, by default, is hidden from view. Here’s how to enable it:

    Step 1

    Launch Outlook 2010.

    Step 2

    Click the File tab and choose Options.
    Reveal Developer Tab in Outlook 2010

    Step 3

    Click Customize Ribbon on the left-hand panel. Now, in the list on the far right, make sure Developer is checked. Click OK.
    Reveal Developer Tab in Outlook 2010

    Step 4

    The Developer tab will now be revealed in your Outlook 2010 ribbon.
    Reveal Developer Tab in Outlook 2010

    Automatically BCC Outgoing Messages in Outlook 2010

    Now, it’s time to add the code that Mr. Kizer put together.

    Step 1

    Go to the Developer tab and click Visual Basic.

    Step 2

    On the left, expand Project1 (VbaProject.OTM to reveal Microsoft Outlook ObjectsExpand Microsoft Outlook Objects and then double-clickThisOutlookSession.
    Auto BCC with Outlook 2010

    Step 3

    In the code editor window, choose Application from the drop-down menu in the top-left.
    Auto BCC with Outlook 2010

    Step 4

    In the top-left drop-down menu, choose ItemSend.
    Auto BCC with Outlook 2010

    Step 5

    Position your cursor after “Private Sub Application_ItemSend(ByVal Item As Object, Cancel As Boolean)” and before “End Sub.” Now, copy and paste the following between those two lines.
    1
    2
    3
    4
    5
    6
    7
    8
    9
    10
    11
    12
    13
    14
    15
    16
    17
    18
    19
    20
    21
    22
    23
    24
    
    Dim objRecip As Recipient
    Dim strMsg As String
    Dim res As Integer
    Dim strBcc As String
    On Error Resume Next
    
    ' #### USER OPTIONS ####
    ' address for Bcc -- must be SMTP address or resolvable
    ' to a name in the address book
    strBcc = "SomeEmailAddress@domain.com"
    
    Set objRecip = Item.Recipients.Add(strBcc)
    objRecip.Type = olBCC
    If Not objRecip.Resolve Then
    strMsg = "Could not resolve the Bcc recipient. " & _
    "Do you want still to send the message?"
    res = MsgBox(strMsg, vbYesNo + vbDefaultButton1, _
    "Could Not Resolve Bcc Recipient")
    If res = vbNo Then
    Cancel = True
    End If
    End If
    
    Set objRecip = Nothing

    Step 6

    Look for the line that reads: strBcc=”SomeEmailAddress@domain.com” and replace the email address you’d like to BCC for SomeEmailAddress@domain.com. For example, swap it out for mysecondaryemail@gmail.com origbrother@supervisor.com.
    Auto BCC with Outlook 2010

    Step 7

    Don’t forget to save the changes. Close the Visual Basic Editor and return to Outlook.
    Auto BCC to Outlook 2010
    Now, when you send messages from Outlook 2010, they’ll be automatically BCC’d to the recipient you chose in the Visual Basic editor. You don’t have to type their name in the BCC field, nor will you even see it entered into the BCC field, since the Visual Basic script kicks in after you hit send. (A handy tip for any cyber spies).
    Auto BCC to Outlook 2010
    Filtering BCC Gmail Messages
    And there you have it.

    Filtering BCC’d Gmail Messages

    One last thing to note: if you’ll be using this to build a Gmail archive, I recommend using a customized Gmail address with something like +bcc appended to it. However, since the address won’t show up in the to: field, you can’t filter it out like normal. So, instead you’ll have to use the “deliveredto:” string in Gmail. For example, I’d use “deliveredto: username+bcc@gmail.com” and then set up a rule that automatically archives these messages and marks them as read.
    Filtering BCC Gmail Messages

    A Note About Macro Security

    Note: This section may help those who find that the macro stops working the next day or after a system restart.
    In order to get this to work, you may need to alter your macro security settings. Either way, you’ll probably get a nagging message like this when Outlook 2010 launches:
    SNAGHTML433faf
    As you can see, that just refers to the script that you put into ThisOutlookSession—it doesn’t mean you have a virus. You can click Enable Macros to proceed with your Auto BCC script intact.
    If you want to skip this step, you can change your Macro Security settings by going to the Developer tab and clicking Macro Security.
    Outlook 2010 Macro Settings
    Under “Macro Settings,” you’ll have a few different options:
    Outlook 2010 Macro Settings

    Friday, 30 January 2015

    network configure in centos

    vim /etc/sysconfig/network-scripts/ifcfg-eth0
    
    BOOTPROTO=none
    DEVICE=eth0
    IPADDR=192.168.1.10 # your IP address
    NETMASK=255.255.255.0 # your netmask
    NETWORK=192.168.1.0 
    ONBOOT=yes


    Add GATEWAY to your /etc/sysconfig/network file:

    NETWORKING=yes
    NETWORKING_IPV6=yes
    HOSTNAME=hostname.domainname
    GATEWAY=192.168.1.1 # your gateway


    Issue the following command to start network on boot:
    chkconfig network on


    Restart your network service:
    service network restart


    Take a look at your network interfaces

    ifconfig
    

    Wednesday, 7 January 2015

    Remove user profile

    To clear user local profile via registry:
    1. Press on Start > Run >Regedit (or windows + r key)
    2. Navigate to the following registry key :“HKEY_LOCAL_MACHINE\SOFTWARE\Microsoft\Windows NT\CurrentVersion\ProfileList
    3. Under ProfileList navigate to binary key’s like this: S-1-5-21-3656904587-1668747452-4095529-500
    4. On the right side under ProfileImagePath you'll see the profile path.
    5. Chose the one with the desired user and delete the long registry key like: “HKEY_LOCAL_MACHINE\SOFTWARE\Microsoft\Windows NT\CurrentVersion\ProfileList
    6. Reboot your system

    Thursday, 4 December 2014

    Reset DSRM Password

     Reset DSRM Password with Ntdsutil

    1. On your machine and login with  Administrators, select Run from the Start menu, type ntdsutil and click OK. Ntdsutil
    2. At the Ntdsutil command prompt, type set dsrm password.
    3. At the DSRM command prompt, run the Reset Password command, passing the name of the server on which to change the password, or use the null argument to specify the local machine. For example, to reset the password on server thanos, enter the following command:
      reset password on server test 
      To reset the password on the local machine, specify null as the server name:
      reset password on server null
      
      
    4. You'll be prompted twice to enter the new password.
    5. Type q to exit the DSRM command prompt.
      reset DSRM password
    6. At the Ntdsutil command prompt, type q to exit.
    You can now use the local administrator account to log on to the Directory Services Restore Mode using the new password. 
     Ex.   username :    .\administrator
             password :     xxxxxxxx     

    Tuesday, 2 December 2014

    How to prevent copy paste file from Remote deskto

    By default we can copy and paste file/folder form Remote Desktop. We can prevent this service by using Group Policy/ Local Policy.

    Follow below step and prevent copy and paste data from RDP easy.


    1. Press Window + R > Run > TYPE gpedit.msc
    2. Navigate to: Computer Configuration \ Administrative Templates \ Windows Components
       \ Remote Desktop Services \ Remote Desktop Session Hosts  \ Device and Resource Redirection \ Do not allow clipboard redirection \ Enable it
    3. Open Command prompt \ TYPE gpupdate /force \ Enter
    4. Reboot system 

    Saturday, 7 June 2014

    difference between Gnome and KDE

    GNOMEKDE and Xfce are the most popular desktop environments for Linux. Most people end up using the default desktop environment that ships with their preferred Linux distribution. But experienced users prefer one over the year for either usability, performance, design or customizability considerations.
    GNOME began as a project to develop a free and open-source desktop environment and corresponding applications in August 1997. Its design philosophy can be best described as streamlined and easy to use.
    KDE community started in October 1996. Its design philosophy is dedicated to functionality and expansion of its features.
    This comparison is a wiki. Please feel free to improve the comparison chart or the description below it.

    Comparison chart

     </> Embed this chart
    Edit this comparison chart

    GNOME

    User Rating (16): 
    GNOME

    KDE

    User Rating (17): 
    KDE
    Introduction (from Wikipedia)GNOME (GNU Network Object Model Environment) is a desktop environment—a graphical user interface that runs on top of a computer operating system—composed entirely of free and open source software.KDE is a desktop environment for an integrated set of cross-platform applications designed to run on Linux, FreeBSD, Microsoft Windows, Solaris and Mac OS, designed by the KDE Community.
    FocusFree softwareFree software
    DeveloperThe GNOME ProjectKDE
    WebsiteGNOME.orgkde.org
    Founded19991996
    Current Stable Release3.10 (September 26, 2013)4.11 (August 14, 2013)
    Minimum System Requirements700 Mhz CPU, 768 MB RAM1 Ghz CPU, 615 MB RAM
    Design GoalsA top-to-bottom free desktop environment designed for simplicity, accessibility, and ease of internationalization and localization.A one-stop, integrated desktop environment; carrying out day-to-day tasks without reliance on command-line interface.
    MottoAn intuitive and attractive desktop for usersExperience Freedom!
    ToolkitGTK+Qt
    Founder(s)Miguel de Icaza and Federico Mena

    Wednesday, 21 May 2014

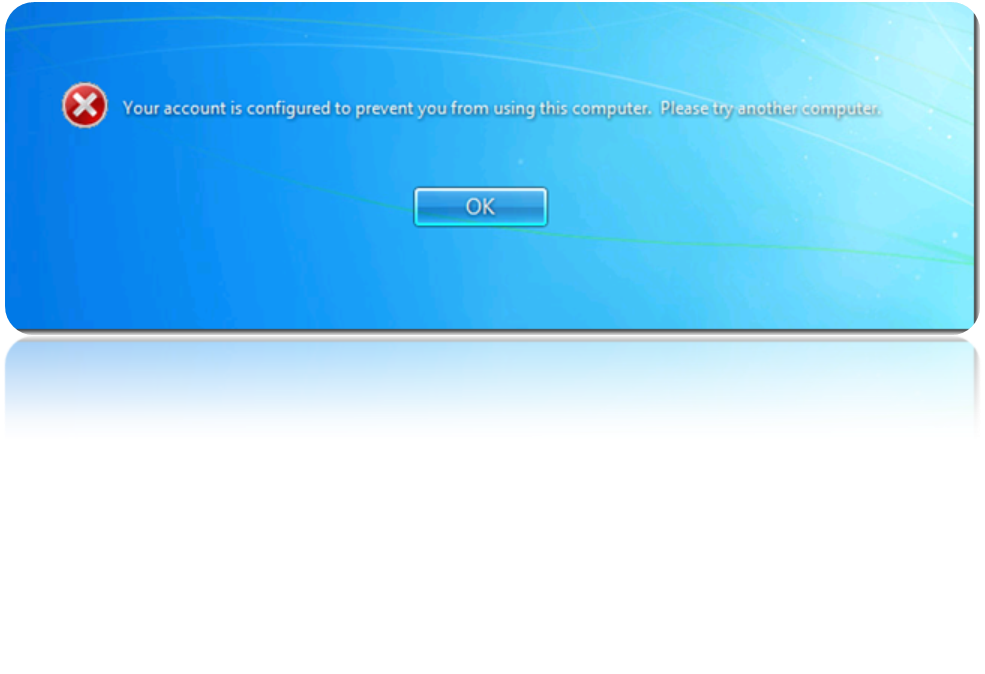
    Your account is configured to prevent you from using this computer


    This behavior is generally the result of a security policy that shuts down the computer if audit events cannot be logged.

    If Windows cannot log events in the Security Log, Non-Admin users attempting to login will receive a message like: “Your account is configured to prevent you from using this computer. Please try another computer.”

    You receive massage as blow when you login non-administrator account in windows 7 
    your_account_is_configured_to_prevent_Windows_7

    Follow some instruction :
    1. Disable the Shut down your system immediately if unable to log security audits policy, which may be defined in the default domain policy, default domain controller policy, and/or local security policy. The path to this policy is:
    Computer Configuration / Windows Settings / Security Settings / Local Policies / Security Options.
    2. Set the CrashOnAuditFail Value Name to a data value of 0.

    Wednesday, 7 May 2014

    No more connections can be made to this remote computer at this time


    No more connections can be made to this remote computer at this time


    Error show in windows xp/vista/7. Windows XP usually has 10 and Vista/7 has 15 connection.

    Follow some instructions and allow more connection

    1. Click START
    2. Click RUN
    3. Type in: regedit
    4. Click on OK/RUN
    5. Locate and then click to select the following Registry Subkey: HKEY_LOCAL_MACHINE\SYSTEM\CurrentControlSet\Services\LanmanServer\Parameters
    6. In the Edit Menu, click NEW and click DWORD. (If exists, skip to step 8 )
    7. Type MaxMpxCT and press ENTER
    8. Right-Click MaxMpxCt and click Modify
    9. In the Value data box, choose DECIMAL ***
    10. Click OK and close the Registry
    I hope your issue has been solve.


    Tuesday, 6 May 2014

    clear standby memory in windows server 2008r2

    Clear Standby Memory in windows server 2008 r2


    download RamMap application by using below ling

    http://technet.microsoft.com/en-us/sysinternals/ff700229

    Have you ever wondered exactly how Windows is assigning physical memory, how much file data is cached in RAM, or how much RAM is used by the kernel and device drivers? RAMMap makes answering those questions easy. RAMMap is an advanced physical memory usage analysis utility for Windows Vista and higher. It presents usage information in different ways on its several different tabs:
    • Use Counts: usage summary by type and paging list
    • Processes: process working set sizes
    • Priority Summary: prioritized standby list sizes
    • Physical Pages: per-page use for all physical memory
    • Physical Ranges: physical memory addresses
    • File Summary: file data in RAM by file
    • File Details: individual physical pages by file
    Use RAMMap to gain understanding of the way Windows manages memory, to analyze application memory usage, or to answer specific questions about how RAM is being allocated. RAMMap’s refresh feature enables you to update the display and it includes support for saving and loading memory snapshots.
    For definitions of the labels RAMMap uses as well as to learn about the physical-memory allocation algorithms used by the Windows memory manager, please see Windows Internals, 5th Edition.


    Thursday, 1 May 2014

    Clear Cache

    Operating System    To get to the Command Prompt/Terminal    Command to use to clear DNS Cache at the Command Prompt/Terminal
             
    Windows   Go to Start Menu > Run > Type "cmd" > press Enter/Return  
    ipconfig /flushdns
    dnscmd  /clearcache     (server)

             
    Mac OSX 10.4 (Tiger)   Click the Terminal icon in the dock or in Finder (in /Applications/Utilities/)  
    lookupd -flushcache

             
    Mac OSX 10.5 & 10.6 (Leopards)   Click the Terminal icon in the dock or in Finder (in /Applications/Utilities/)  
    dscacheutil -flushcache
             
    Mac OSX 10.7 & 10.8 (Lions)   Click the Terminal icon in the dock or in Finder (in /Applications/Utilities/)  
    sudo killall -HUP mDNSResponder

             
    Mac OSX 10.9  (Mavericks)   Click the Terminal icon in the dock or in Finder (in /Applications/Utilities/)   dscacheutil -flushcache;sudo killall -HUP mDNSResponder

             
    Linux (most distributions)   Open a terminal window
    (gnome-terminal, konsole, xterm, etc.)
     
    sudo /etc/init.d/nscd restart
    or
    sudo /etc/init.d/networking restart 

    Tuesday, 1 April 2014

    Cannot Create Hyper-V Virtual Machine within VMware Workstation VM

    Cannot Create Hyper-V Virtual Machine within VMware Workstation VM

    When virtual machine is created inside VMware workstation, under normal conditions, it can be used to install 32-bit version of the operating systems. In case you want to install 64-bit version of the operating systems, your physical computer (host computer) must have Hardware Accelerated Virtualization integrated in it.

    When talking about Hyper-V, it is the role of Windows Server 2008 and Windows Server 2012 and is only available in the 64-bit versions of these network operating systems (NOS). Since Hyper-V is the feature using which administrators can create multiple virtual machines within a single host Windows Server 2008 or Windows Server 2012 OS, the process of installing either of these operating systems within the VMware Workstation, and creating and using virtual machines within these operating systems using Hyper-V can be referred to as nested virtualization.

    If your computer has Hardware Accelerated Virtualization present in it, 64-bit Windows operating systems can be installed easily on the virtual machines within the VMware Workstation. However to install Hyper-V and then to install and use the virtual machines within a virtual machine in the VMware Workstation, you must create your VMware Workstation virtual machine and modify its .VMX file accordingly.

    Below is the process using which you can create VMware Workstation virtual machine and modify its .VMX file so that the VM can be used to install Hyper-V and can allow you to create a nested virtualization setup:


    1. Log on to the computer with the user account on which the virtual machine is to be customized for Hyper-V.
    2. If already not created, create a new virtual machine in the VMware Workstation selecting the Microsoft platform with Windows Server 2008 x64 operating system in the Select a Guest Operating System window during the VM creation process.
    3. Once the virtual machine is successively created, on the VMware Workstation console, click to select the target virtual machine tab.
    4. Once selected, click the Edit virtual machine settings option from the right pane of the VMware Workstation interface.

    5. On the Virtual Machine Settings box that appears, make sure that the Hardware tab is selected.
    6. In the left pane, click to select Processors option.
    7. In the right pane, from the Preferred mode drop-down list under the Virtualization engine section, choose the Intel VT-x/EPT or AMD-V/RVI option.
    8. Also, check the Virtualize Intel VT-x/EPT or AMD-V/RVI checkbox from the same interface.

    9. Finally click OK button to save the changes.
    10. Once the entire process is complete, exit the VMware Workstation application.
    11. Using the Windows Explorer, locate the corresponding .VMX file of the virtual machine.
    12. Open the located file in the Notepad application.
    13. Add the hypervisor.cpuid.v0 = “FALSE” perimeter at the end of the file.

    14. Save the file, and start the VMware Workstation application.
    15. Run the target virtual machine, install Windows Server 2008 64-Bit operating system on the VM, and install the Hyper-V or role to configure the nested virtualization network setup.