Wednesday 31 July 2013

How to Install Windows 7 Using USB/


What is bootable?

In simple words, Boot means start. Bootable device means, the device that can help to start a program without any Operating system. For example: ‘Windows installation disk’.

There are two Method
1. Windows 7 USB-DVD Download Tool.
2. Create bootable pen drive using command prombt

Method 1:
1. Download "RUFUS" tool, it is a very lite-bit tool
note: click here http://www.softpedia.com/get/System/Boot-Manager-Disk/Rufus.shtml free download
2. attached usb drive
3. once you download you add window iso image file and run
4. when complete it, u can use it

Method 2:
1.USB flash drive with a minimum capacity of 4 GB but 8 GB is preferable for Windows 8.
 2.Windows 7 Windows installation Setup DVD or you can download Windows ISO file and extract it into your local.

Step 1 : Plug-in your USB flash drive (Pen Drive).

Step 2: Run > type "CMD" > Enter
1. enter the following commands in the MS DOS window.
 

2. LIST DISK 


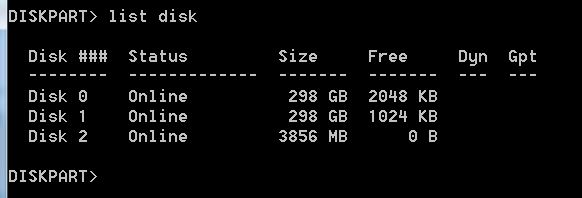
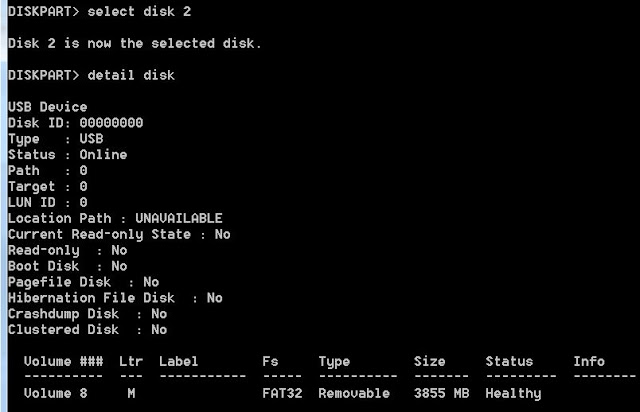
3. In the list find the disk number of your USB and enter that number instead of red colored number in the following command, here disk number is selected as 2 see image for detail.
 
4. Then you have to run a series of commands. The commands to be run in the order are:-
> clean
> create partition primary
> select partition 1
> active
> FORMAT FS=NTFS (format process may take some time)
> ASSIGN 
> EXIT

Don't close the command prompt now!

Insert the windows DVD in drive and see the letter of your DVD drive and USB drive in "my computer" window and use those letters instead of red colored letters in following commands


  • D: CD BOOT (D is the drive letter of DVD drive)

  • Bootsect.exe /nt60 L: (where ‘L’ is the drive letter assigned to your USB key from the previous step)


    Now exit command prompt and copy window DVD content on USB drive. Your pen drive is ready and you can boot windows with it but you need to change BIOS boot priority settings before starting installation.

    And finally your USB pen drive is now ready to boot and install the OS for you. Don’t forget to enable the “USB Boot” option and change the “Boot priority to USB device from hard disk” in your BIOS settings.

                            bios-setup


    your current security setting do not allow you to download files from this location


    Your current security settings do not allow you to download files from this location.


    Problem: I was trying to download something from an ftp server to on windows server 2k8. i can't copy and received the following error "Your current security settings do not allow you to download files from this location."


    The solution

    In this case the solution is actually quite easy. You need to a an exception in the security section of your Internet Explorer Internet Options.
    1. Open IE
    2. Open Tools > Internet Options > Security
    3. Click on Trusted Sites then the sites button below
    4. Enter the URL of the site you’re downloading from and click add
    5. now, retry download

    How To disable the Shutdown Tracker in Windows Server 2008

    When I want shutdown Windows Server 2008, that ask some question about reason why I want shutdown Windows Server. How can I disable this stage (Event Tracker) in Windows Server 2008?

    Event Tracker

    Method 1: Using Group Policy

    1. Click Run in the menu Start, then type gpedit.msc and click OK. Now the Local Group Policy Editor will open.

    shutdown1.jpg


    2. Browse to Administrative Templates in Computer Configuration, click System and double click in the right window on Display Shutdown Event Tracker. Change its value toDisabled and click OK to save the change.


    Method 2: Using Registry

    If you prefer to use the Registry to perform this action, then type regedit from the Run dialog or an administrative command prompt and navigate toHKEY_LOCAL_MACHINE\SOFTWARE\Policies\Microsoft\Windows NT\Reliability. Next, open the ShutdownReasonOn value and set it to 0.

    Disable Shutdown Event Tracker through Group Policy

    Tuesday 30 July 2013

    How to verify whether DNS is working correctly


    After you have setup your DNS Server, it's very important to check that the entries
    which are populated to the Internet are correct. You can use the following checklist
    using nslookup.

    Start nslookup for the desired DNS Server
    nslookup
    > server 193.247.121.196
    Default Server: rabbit.akadia.ch
    Address: 193.247.121.196

    Check Start of Authority (SOA)
    > set q=SOA
    > akadia.com
    Server: rabbit.akadia.ch
    Address: 193.247.121.196

    akadia.com
    origin = rabbit.akadia.com
    mail addr = postmaster.akadia.com
    serial = 2000061501
    refresh = 10800 (3H)
    retry = 3600 (1H)
    expire = 604800 (1W)
    minimum ttl = 86400 (1D)
    akadia.com nameserver = rabbit.akadia.com
    akadia.com nameserver = lila.thenet.ch
    rabbit.akadia.com internet address = 193.247.121.196
    lila.thenet.ch internet address = 193.135.252.2

    Check the Nameservers (NS)
    > set q=NS
    > akadia.com
    Server: rabbit.akadia.ch
    Address: 193.247.121.196
    akadia.com nameserver = lila.thenet.ch
    akadia.com nameserver = rabbit.akadia.com
    lila.thenet.ch internet address = 193.135.252.2
    rabbit.akadia.com internet address = 193.247.121.196

    Check E-Mail MX-Records (MX)

    > set q=MX
    > akadia.com
    Server: rabbit.akadia.ch
    Address: 193.247.121.196

    akadia.com preference = 20, mail exchanger = opal.akadia.com
    akadia.com preference = 10, mail exchanger = rabbit.akadia.com
    akadia.com nameserver = rabbit.akadia.com
    akadia.com nameserver = lila.thenet.ch
    opal.akadia.com internet address = 193.247.121.197
    rabbit.akadia.com internet address = 193.247.121.196
    lila.thenet.ch internet address = 193.135.252.2

    Lookup all hosts within a domain
    > ls -d akadia.com

    Monday 29 July 2013

    how to attach a vhd parmanet

    STEP--1


    1) Click Start – Right-Click Computer – Select Manage {Authorize the elevation if prompted}
    image

    2) Expand Storage – Select Disk Management – Right-Click Disk Management – Select Attach VHD
    image
    3) Browse to select the VHD – Click OK
    image


    STEP--2
    1. Install "winvhd" tool
    note : click here http://www.softpedia.com/get/System/Hard-Disk-Utils/WinVHD.shtml download this too or search from google search engine.

           "The main window of WinVHD allows you to mount and explore any VHD image you want."
    WinVHD screenshot 1 - The main window of WinVHD allows you to mount and explore any VHD image you want. 

                     "You can insert and mount a VHD image and compact all the files from the context menu."

    WinVHD screenshot 2 - You can insert and mount a VHD image and compact all the files from the context menu.

    "You can choose to launch the application when your system start from the WinVHD options window."

    WinVHD screenshot 3 - You can choose to launch the application when your system start from the WinVHD options window.

    Now restart your system. When you login again, you get vhd drive attached.

    I hope this helpful for your, Enjoy

    How to Create a Virtual Hard Drive in Windows

    Create a Virtual Drive 
    This process creates virtual disks in the .VHD format where the minimum size is 3MB

    1. Right-click on My Computer and select to Manage
              or 
        start > run > type "compmgmt.msc" > enter
    1-vhd
    The Computer Management screen opens click on Disk Management then Action and Create VHD 
    Note : free space must be available in physical HDD
    2.  Go to action and create VHD

    3. Browse to the directory you want the disk to reside, choose the size you want it to be,
       and select dynamic or a fixed. If you want the disk to expand in size as you add files to it,
        then pick Dynamically expanding. Check Fixed size if you want a specific size and for it to
        stay that way.


    To begin using it you’ll need to Right-click and select Initialize Disk.
     
    In the initialize disk box just keep MBR selected and hit OK.
    Create a Volume
    Now it is time to create a volume by Right-clicking the unallocated space and select New Simple Volume.
    The New Simple Volume Wizard starts up and it’s just a matter of completing it.
    Choose the amount of space you want to use for the volume.
    Assign it a dive letter that is not currently being used.
    Format the new volume as NTFS, FAT32, or FAT. Check if you want a quick format and file compression.
    The wizard is complete, click on Finish.
    If you have AutoPlay enabled it should pop up for you to open up your new virtual hard disk.
    It will be listed with the other disks in Disk Management.
    Of course you will also see it listen under My Computer.

    How to Create Personal Folders in Outlook 2007


    Information

    Personal Folders are files that Microsoft Outlook uses to store emails locally on a computer. If you are approaching the size limit for emails stored on the Exchange server, Personal Folders are a perfect way to reduce the size of your mailbox while retaining those emails. Read more about size limits here

    Creating a Personal Folder

    1. Open Outlook 2007
    2. Click Tools > Account Settings...
    3. Click the "Data Files" tab
    4. Click the "Add..." button
    5. Click "Office Outlook Personal Folders File (.pst)" to select it
    6. Click OK
    7. Select a location where you'd like to save the Personal Folders file. We suggest using an easy-to-find location such as a folder named "Outlook" within "My Documents". Once you have selected a location, type a name for the Personal Folder file (this is the name of the saved file on your hard drive, not the name that will display in Outlook), and click OK
    8. To change the name that the Personal Folder will display in Outlook, type the desired name in the "Name" field.
    9. To password protect your Personal Folder you may enter a password in the fields provided. For no password protection, just leave it blank.
    10. Click OK
    11. Click Close
    12. You will now see the personal folder in the Mail Folders pane in the left column of Outlook

    Moving Items to Personal Folders

    1. Find the email or folder you wish to move to you personal folder
    2. There are two ways to move an Outlook item to a personal folder:

    Right-click menu

    1. Right-click the item
    2. Click Move to Folder...
    3. Select the personal folder by clicking it, then click OK

    Repair Outlook Data Files (.pst and .ost)

    If you cannot open your Outlook Data File (.pst), or you suspect that the data file is damaged, you can use the Inbox Repair tool (scanpst.exe) to diagnose and repair errors in the file. The Inbox Repair tool scans only Outlook Data Files (.pst or .ost) on your computer and analyzes the file structure integrity.


    Inbox Repair tool (scanpst.exe)

    Scanpst.exe is installed on your computer when you install Microsoft Outlook 2007&10. The Inbox Repair tool tries to correct any problems by resetting the data file structure and rebuilding the headers for Outlook items. If you are using an Exchange account, the tool does not connect to or analyze the data saved on the Exchange server

    Note :You must exit Outlook before using the Inbox Repair tool. It is not accessible within Outlook.

    1. If install office 2007 Open Windows Explorer and select the c:\Program Files\Microsoft Office\OFFICE12 and if u install office 2010 then  Open Windows Explorer and select the c:\Program Files\Microsoft Office\OFFICE12 folder.
    2. Double-click Scanpst.exe.
       scanpst.exe office 2010
    3. In the Enter the name of the file you want to scan box, enter the name of the .pst or .ost file that you want to check, or click Browse to select the file
      Outlook Inbox Repair Tool
    4. To specify the scan log options, click Options, and then click the option that you want.
    5. Click Start.
    6. If errors are found, you are prompted to start the repair process to fix the errors.
      A backup file is created during the repair process. To change the default name or location of this backup file, in theEnter name of backup file box, enter a new name, or click Browse to select the file that you want to use.
      1. Click Repair.
      2. Start Outlook with the profile that contains the .pst file that you tried to repair.
      3. In the Navigation Pane, click Folder List.

        Keyboard shortcut
          To open switch to the Folder List, press CTRL+6.

    Saturday 27 July 2013

    How to rename a Windows Server 2008 domain


    I used it to rename a Windows Server 2008 domain in my test lab environment. The process was pretty straightforward but it may require more tasks if you have multiple DCs in a multi domain environment.

    The Forest and Domain Functional Level should be Windows Server 2008 to proceed with the following task.

    From the command prompt, I started out by running rendom /list which outputs an XML file (Domainlist.xml) to the directory where rendom resides. You edit that file to change your domain configuration to the new domain name. i.e ForestDNSZones, DomainDNSZones, Netbios name. See referenced link for details.

    After you have modified the file you can run rendom /showforest which shows you the future configuration, verify and make changes if necessary.


    Upload the changes you have made in the XML file: Run rendom /upload

    Verify readiness of Domain Controller(s): Run rendom /prepare

    Execute domain rename instructions: Run rendom /execute

    After thats finishes up successfully, you should also run GPFIXUP tool to fix up GPO references to your old domain name


    Here is an example 

    C:\Users\Administrator>gpfixup /olddns:08r2.lab /newdns:mcts.lab Group Policy fix up utility Version 1.1 (Microsoft)

    Start fixing group policy (GroupPolicyContainer) objects:

    ……..

    Start fixing site group policy links:
    .

    Start fixing non-site group policy links:
    ….
    gpfixup tool executed with success.

    C:\Users\Administrator>gpfixup /oldnb:08r2 /newnb:mcts
    Group Policy fix up utility Version 1.1 (Microsoft)

    Start fixing group policy (GroupPolicyContainer) objects:
    ..
    gpfixup tool executed with success.

    Lastly, run rendom /clean

    The identity (domain GUID) of the renamed domain does not change during a domain rename operation. Thus a computer’s domain membership does not change as a result of the holding domain being renamed.

    However, every member computer joined to the renamed domain needs to be rebooted twice. Please refer to “How Domain Rename works” technical reference for more info.


    how to check host name and mac address on remotely

    I use "nbtstate" command 

    1. start > run > type cmd > enter
    2. c:\nbtstat -a (ip address of destination machine)

    example:

    Black screen on windows 7 Virtual machine

    1. booted the vm using windows 7 iso and choose the option  
        to repair.


    2. repair windows with “command prompt”
    3. run below command 

    c:\bootsect.exe /nt60 all /force

    now restart your system i hope it log on successfully

    Windows: Disable “Publisher Could Not Be Verified” Messages


    Disable the warning message that says “The Publisher Could Not Be Verified” when you run certain files in
    Windows.


    1. Click Start > Run and type gpedit.msc. Click OK

    2. Go to User Configuration > Administrative Templates > Windows Components > Attachment
    Manager

    3. Open the Inclusion list for moderate risk file types setting.

    4. Set the policy to Enabled, then add “*.exe;” or whatever the file extension you are using to the Specify high risk extensions box.


    Move older file and folder


    c:\ROBOCOPY  "source"  "destination"  /move  /minage:(number of days oldfile)


    Example
    c:\>ROBOCOPY d:\data d:\ext  /move /minage:4

    Remove older file/foler by cmd


    c:\>forfiles -p "path" -s -d -(number of days) -m (file/folder name) "cmd / del  /f  /q @path

    Exmaple : 
    i want to remove all text file who older than 2 day, and store in d:\


    c:\>forfiles -p "d:\data" -s -d -2 -m *.txt -c "cmd /c del /f /q @path"

    Friday 26 July 2013

    Log on with a Temporary Profile

    STEP ONE


    1. To Boot into Safe Mode for the built-in Administrator account
    2. Backup your profile database in other drive/device

    STEP TWO

    Delete the User Account Profile's SID Key

    1. Backup anything that you do not want to lose in this user account's C:\Users\(user-name)  
       profile folder,
    if the profile folder still exists, to another location, then delete the (user-name)
        profile folder.

    2. Open the Start menu.
    3. In the Start Menu search box, type regedit and press Enter.
    4. If prompted by UAC, then click on Continue (Vista) or Yes (Windows 7).
    5. In regedit, go to
       HKEY_LOCAL_MACHINE\SOFTWARE\Microsoft\Windows NT\CurrentVersion\ProfileList


    6. In the left pane, click on one of the S-1-5..... folders (SID key) with the long number.
        (See screenshot below step 7)
        NOTE: It should have .bak at the end of it.
         A) In the right pane, look at the ProfileImagePath to see if this is the same user account that you
              deleted in step 1 above.
         B) Repeat step 6 until you find the one that you deleted in step 1 above.


    7. To Backup the Registry SID Key
        WARNING: You should backup this SID key to be safe in case you delete the wrong one in step 8 below.
       A) Right click on the SID key from step 6, and click on Export.
       B) Type in a name and save the REG file to a safe location.
    NOTE: This is your backup. To Restore the Backup, right click on the REG backup file and click on
    Merge.
    http://www.vistax64.com/attachments/tutorials/3016d1204573361-user-profile-error-logged-temporary-profile-repair.jpg

    8. Right click on the SID key, from step 6 with bak at the end, and click on Delete. (see screenshot above)
    9. Click on Yes to confirm deletion.

    10. If there is another SID key with the exact same long number from step 6 for this user account without
    bak at the end, repeat step 7 first, then right click on this same SID key, and click on Delete. (see screenshot
    below step 7)
    11. Click on Yes to confirm deletion. (See screenshot below step 9)
    12. Close regedit.
    13. Log off and log on.


    Note
    After you log on to the computer, the profile folder you are having problems with is re-created. If not, then try a
    System Restore using a restore point dated before you got this error. If this still does not help,


    Tuesday 9 July 2013

    Rename a File by current Date and Time

    Hi Friends

    yesterday, I had take backup of my *.pst file successes fully, but i want rename this file with current system date and time.

    so I use below step and i done successfully rename file with current system date and time.


    Step-1: Run > type > cmd > enter

    Step-2: REN "filename" "*%Date:/= % %Time::=.%.*"file extention

    Example :  
    c:\>REN  "d:\ab.txt"  "*%Date:/= %  %Time::=.%.*"txt